Tip #5
Too many how-to books make sewing a simple round-bottom ditty bag difficult and frustrating! I have taught many people to sew ditty bags (including people who have never sewn a stitch) using a simple method shown to me by my mentor, Alex Androsko, when I first started sewing canvas. Ditty bags are fun to sew, you have a useful item when you are done, and the experience can give you confidence to go on to bigger projects.
Any kind of fabric can be used. Canvas, such as Sunbrella or nylon bag cloth are natural choices, but certainly upholstery fabric or sailcloth can be used. An open weave fabric such as Phifertex makes a fine bag for wet swimsuits, or use a lightweight clear vinyl and you can see what's in the bag.
Uses for ditty bags? Sail repair kit, small stuff bag, shower bag, beach bag, tool bag, shopping bag, you get the idea! You are limited only by the amount of stuff you need to corral. A sewing friend once gave Christmas gifts of ditty bags she made containing a movie on DVD or video and a bag of un-popped) microwave popcorn. This makes a perfect inexpensive gift for difficult-to-buyfor cousins, in-laws, etc. We give ditty bags to customers made of scraps of the canvas we used on their boat.
Most instruction books tell you to first sew the side seem, then "pin" the circle to the sides. The problem with this is that if you do not calculate the diameter exactly for the length of the side piece, or if you do not cut your pieces exactly to your calculation, or if your seam allowance isn't exact, then there will be either too much bottom and not enough side, or too much side and not enough bottom.
The solution is to cut the side piece a little longer, two or three inches, sew the side piece to the circle, then simply trim off the extra cloth. As long as you've added extra fabric to your side piece, you can't miss, even if your seam allowance isn't exactly 1/2 inch. Here are complete directions...
Sewing Instructions
Our finished bag is 12" tall with an 8" diameter bottom. Cut fabric as follows: One rectangle measuring 15" x 29", the "side," and one circle with a 9-inch diameter, the "bottom." Also needed will be one grommet and about 36 inches of line. A #0 spur grommet with 1/8" line works well.
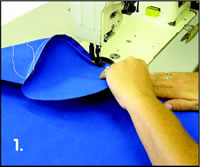
The first step is to sew the round bottom to one of the long edges of the side piece. Match one corner of the side 1/2" in from the side and 1/2" up from the bottom to any point on the circle 1/2" in from the edge. 1).
(If your fabric has a right and a wrong side, be sure to start sewing with the right sides together.)
Start sewing here with the round piece on top. Sew slowly, and try to keep a consistent 1/2" seam allowance while keeping the edges of the two pieces even at the needle. (You may find it easier to mark the seam allowance on the round bottom piece. You can then concentrate on keeping the edges even.) You will see the bag taking shape behind the needle as you sew (Picture 1).
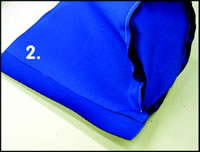
Sew around to where you started (without sewing into the seam allowance left for the side seam), and don't forget to backstitch at the beginning and the end to lock the stitches. Cut off the extra fabric left on the side piece leaving 1/4" to 1/2" seam allowance (Picture 2).
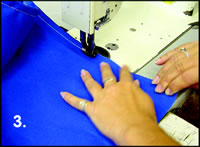
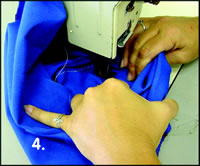
Now sew the side seam (Picture 3). Leaving the bag inside out, top stitch the bottom of the bag, folding the seam to the inside of the bottom, then topstitch the side seam (Picture 4).
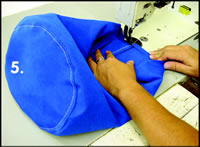
Cut the loose threads, and turn the bag right-side out. Next, fold the top edge over 1/2" and sew (this finishes the raw edge) (Picture 5).
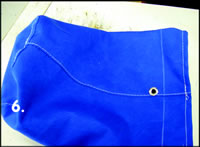
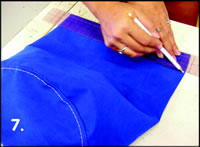
From this new top edge, measure and draw a line 2" down all the way around on the outside of the bag (use chalk so you can brush it off when you're done). At the seam, install a grommet below the 2" line (Picture 6, 7). (Install the grommet through the seam allowance if there is room. If not, you'll need to use some reinforcement fabric to back-up the grommet to keep it from pulling out.)
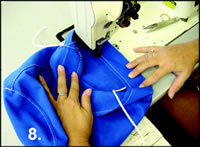
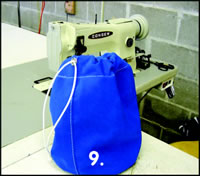
Fold on the 2" mark, forming a hem. and sew, inserting the line into the hem for the drawstring coming out of the grommet (Picture 8). Knot the two ends of the line together (Picture 9).
Keep in mind that a you can use this same method to sew sail bags, duffel bags, laundry bags, any size for a multitude of uses. And save your scraps from other sewing projects. Ditty bags take just a small amount of fabric, a small amount of time, and are an indispensable addition to any boat.
By: Jean Carroll
Latitudes & Attitudes December 2003 Issue p.137
